Wednesday, 28 August 2013

Eco-Friendly Paints for Ganesha Idols

Its the season for modhaks and laddoos. Its that time of the year when Idols of Lord Ganesha, the ever lovable remover of obstacles, are brought home and decorated with great enthusiasm. Also it is the time to reaffirm our responsibility towards an eco friendly celebration.


How to ?

. Buy only Idols made of clay.
. Make sure that the paints used on the idols are environment friendly.
. Environment friendly paints = paints not containing heavy metals like lead, arsenic, chromium, mercury + paints having low % of volatile organic compounds (VOCs).
. Preferably use water based paints as these are low in VOC and also dry faster than solvent/oil based paints.

What products to use ?      

An ideal paint for this purpose is Asian Paints Royale Luxury Emulsion.

. It is water based.
. Has low VOC.
. Has no lead, arsenic, chromium, mercury. 
. Has the Asian Paints Green Assure guarantee.

. Colour Spectra - It is available in a variety of shades (more than 1000 shades) which range from whites, pastels, mid tones to dark and vibrant colours. These shades are available in 200ml, 1L, 4L, 10L and 20L packs.

. Glitter Shades -  It also has metallic shades such as gold, copper, bronze, silver and almost 40 other such shades. These shades are available in 200ml and 1L packs.

. The 200ml packs are ideal for small idols. 

Asian Paints Royale Luxury Emulsion is readily available in stock in all the above packs at our store (click to locate on map)


How to Use ?

. Apply a coat of water based primer diluted to the required consistency with a brush on to the clay idol. Allow to dry for 4-5 hrs.
. Now apply Royale Luxury Emulsion in the desired colours on to the idols.
. Allow to dry for 4-5 hours before handling.

Royale can also be used to decorate your walls to give your festivities that Royale touch.

Happy Painting!! Happy Ganesha Chaturthi!!

Asian Paints Royale Luxury Emulsion is a trade mark wholly owned by Asian Paints Ltd.

Thursday, 22 August 2013

How to Waterproof your damaged Terrace/Roof - Rescreeding / Re-laying maddi

Severe leaks in your roof slab can cause premature aging of the slab concrete. This causes


. weakening of the slab
. concrete breaking off, exposing the steel reinforcement bars (spalling)
. in milder cases, paint and putty flaking

not only giving your property a bad appearance but also diminishing its value and life. 

Screed de-bonding is one of the major causes of terrace leakage. Redoing the concrete screed on the terrace can help prevent the leakage. Proper bonding can be achieved by the following system.

Materials Required

. Ordinary portland cement (OPC)
. Aggregates for screeding
. Waterproofing admixture
. Mason's tool kit

Application 

. Check the screed on the terrace for hollow spots using the wooden handle of a hammer.
. Chip off the loose material to obtain a sound surface with straight edges and repair using a polymer modified repair mortar..
. If there is excessive hollowness, chip off the complete screed using a hammer and chisel and remove the debris.
. With clean water, wash off all excess/loose dirt and debris and saturate the mother slab.
. On the side walls, mark the slope that has to be created in the screed, required for water run-off.
. Create the bond slurry using the latex/poly-carboxyl polymer, water and OPC usually in the proportion of 1 polymer : 4 water : 6-8 cement by weight.
. Apply the bond slurry using a large size brush or a hard broom, covering the entire surface evenly. Also apply the bond slurry to a height of about 100mm on the parapet walls.
. Prepare the screed concrete using OPC, aggregates and water containing a waterproofing admixture in the desired proportion (Refer to manufacturer's data sheet for the quantity of waterproofing admixture required).
. In the wet on wet condition (while the bond slurry is still wet), lay the screed concrete over the surface using a trowel to level the surface to obtain a minimum thickness of 50mm. Particular care must be taken to create slopes for water run-off while laying the screed concrete.
. Cure the thus formed cement surface using water.
. Once cured, prime the wall and floor joints using a mixture of 1 latex polymer :1 cement. Form angle fillets of 40mm x 40mm along the wall and floor joints using a polymer modified repair mortar while the primer is still tacky (wet on wet).

A sound screed gives a waterproof terrace.

Saturday, 17 August 2013

How To Waterproof Your Underground(Sump) / Concrete Water Tank

Waterproofing your concrete water tanks can be done in 2 steps.
. During construction - Integral water proofing
. After Construction - Waterproof barrier cum Hygiene coatings

For Integral Waterproofing  

 Waterproof liquids / additives are available to make concrete dense and less porous, reducing water seepage. These liquids reduce the amount of water required to be added to concrete. Less water means dense concrete and lesser pores. 


Materials Required

. Cement, Jelly, Sand, Water (Concrete Mix)

Application

. Measure water required for the concrete mix according to the waterproof liquid's  manufacturer's data sheets.
 The liquid is added to the measured water in the dosage (per bag of cement) as prescribed by the.manufacturer's data sheets.
. The above mixture is then added to the concrete mix. 
. Pour concrete and allow for curing.

Waterproof concrete is ready... or is it really?

 Waterproof barrier cum Hygiene coating

 The above does make the concrete dense but not 100% water proof. Hence, a waterproof barrier coating is recommended.

Materials Required

. Acrylic polymer bound cementitious waterproof coating material - Forms a waterproof, flexible coating.
. 2 component food-grade Epoxy coating material - Forms a hygiene coat; Prevents fungal formation and improves water-tightness.
. Brush

Application

. Saturate the cured cement surface with water.
. Liquid component of the acrylic polymer bound cementitious waterproof coating material is measured out into a bucket.
. The powder (cementitious) component is added slowly while stirring continuously to the liquid in the required proportion (usually 1 liquid : 2 powder by weight or as prescribed in the manufacturer's datasheet). Stirring is very important to avoid formation of lumps.
. Brush apply the mixture on the substrate. 
. Allow the coating to dry. 
. Cure the coating with water.
. Once cured, saturate the coating with water.
. Stir the contents of the 2 part epoxy first in their individual containers to a uniform consistency and then mix the the 2 components in the required proportion (usually the 2 components are available in pre-measured packs or as prescribed in the manufacturer's datasheet). Addition of water as per the datasheet.
. Apply the first coat of the epoxy system with a brush.
. Allow the coating to air-cure for about 6-8hours.
. Brush apply the second coat in a direction perpendicular to the direction of application of the first coat.
. Allow the coating to air-cure and harden. 

The above process takes about 48 hours and water can be filled in the tank after about another 48 hours.

Tuesday, 13 August 2013

Acrylic Crack Filler Products

Crack Fillers available at the store are :

. Sika Cracksil(500g, 1Kg packs)
. Product Rating (5/5)
. Can be tinted with water-based stainers to match the colour of the wall.
. Sika Cracksil Paste TDS.pdf


                            . Asian Paints 
                              Smart Care - Crack Seal 
                              (360g, 900g packs)
                             . Product Rating (5/5)
                              Asian Crackseal TDS                           


 . Dr Fixit Crack X (1Kg, 5Kg packs)
. Product Rating (4/5)


For any queries you can contact us or visit us.

Technical Datasheets for the above products can be found here.

Shree Venkateshwara Traders
#712, Modi Hospital Road, West of Chord Road
Mahalaxmipuram, Bangalore 86

Sunday, 11 August 2013

How to seal and waterproof construction joints - using polyurethane (PU) sealant and bituminus waterproof tape


Construction Joints are different from plaster cracks in many ways. 

. Joints are usually 2mm to 19mm wide, plaster cracks are usually 0.5-2mm wide.
. Joints usually have movements in them such as structural movements, movement due to unequal expansion of adjoining substrates etc. Plaster cracks are usually static.
. Joints can be sealed using permanently flexible compounds, whereas plaster cracks can be filled using materials that become rigid upon curing.

As a result, joints have to be treated differently from cracks. Here is one of the methods that can be used to seal and waterproof joints.

Materials Required 

. Polyurethane sealant
. 100mm wide Bituminous Tape
. Mason's Kit

Application

. Clean out the joints using a wire brush and remove the dust and debris using a dusting brush.
. Using a gun-grade Polyurethane(PU) Sealant, slowly squeeze out the sealant and move along the joint forming a continuous bead. In case of a break in the bead, overlap the new bead with the old for about an inch and continue. Allow the sealant to cure according to the manufacturer's datasheet.
. After the sealant has completely cured, check and fill any gaps.
. Paste the bituminous sealing tape along the joint sealed using the PU sealant, using a rubber roller giving good pressure. In case a rubber roller is not available, a bundle of cotton waste can also be used to apply pressure. At joints in the tape, ensure overlap of about 50mm. 
. If required, an acrylic topcoat can be applied on the tape by first priming the surface using a latex based primer. The topcoat must be spread about 50mm either side of the tape.

No more leaky joints!

Practical Scenarios

The above method can be used to seal joints such as

 . Parapet wall and terrace slab joints.
 . Joints between walls of adjoining buildings.
 . Skylight joints
 . Window-wall joints etc.

Products Available

. Sikaflex PU Sealant


Sikaflex Construction Sealant is a moisture-cured, 1-component, polyurethane-based,
non-sag elastomeric sealant.


Where to Use 
> Designed for all types of joints where maximum depth of sealant will not exceed 1/2 in.
> Suitable for vertical or horizontal joints; readily placeable at 40°F (4°C). 
> Has many applications as an elastic sealant between materials with dissimilar coefficients of expansion.

Ideal for:
> Weatherproofing of joints between brickwork, blockwork, masonry, wood and concrete
or metal frames.
> Joints in walls, floors, balconies, around window or door frames.
> Expansion joints.
> Roofing.
 

Advantages 
> High elasticity – cures to a tough, durable, flexible consistency with exceptional cut and tear-resistance.
> Stress relaxation.
> Excellent adhesion – bonds to most construction materials without a primer.
> Excellent resistance to aging, weathering.
> Non-staining.
> Urethane-based; suggested by EPA for radon reduction.
> Paintable with water-, oil- and rubber-based paints.
> Capable of ±25% joint movement.
> NSF Certified to NSF/ANSI Standard 61 for potable water contact.

. Sika Multiseal Tape


Self-adhesive, rubber modified, bituminous sealing tape, one side laminated with
aluminium foil.


Sealing and repairing against water ingress and draughts in:
  • Roofs including sheet metal work
  • Building cracks
  • Bituminous felts and other types of roofing sheet
  • Joints of wall to wall and floor to wall in sunken slab
  • Joints of AC cement sheet with wall
  • Around pipe penetrations in walls/concrete

Characteristics / Advantages
  • Very easy to apply
  • Very economical
  • Good adhesion to many substrates
  • Weather-proof
  • Self-adhesive
  • UV-resistant
  • Can be over-painted
  • Can be applied at low temperatures
In Store now @
Shree Venkateshwara Traders
#712, Modi Hospital Road, WOC,
Mahalaxmipuram, Bangalore 560086

ph: 9036092531
email : venkateshwara.traders@gmail.com


Thursday, 8 August 2013

Mason's Tool Kit

A Person/Mason undertaking a waterproofing job must have the following in his tool kit

. Hammer
. Concrete Chisel
. Dusting Brush
. Trowel / Karney
. Bandli
. Wire Brush
. Economy painting brush
. Measuring cups

You can contact us or visit us for a quality mason's tool kit.

Shree Venkateshwara Traders
#712, Modi Hospital Road, West of Chord Road
Mahalaxmipuram, Bangalore 86


Terrace Waterproofing - Acrylic Top Coat Products

Acrylic Top Coats available at the store are :

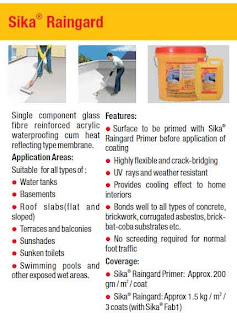
. Sika Raingaurd(5Kg, 10Kg packs)
. Product Rating (5/5)
. Waterproofing cum heat reflecting membrane.
. Raingard TDS.pdf


. Dr Fixit New Coat (4Lt, 20Lt packs)
. Product Rating (4.5/5)
. New Coat TDS.pdf


For any queries you can contact us or visit us.

Technical Datasheets for the above products can be found here.

Shree Venkateshwara Traders
#712, Modi Hospital Road, West of Chord Road
Mahalaxmipuram, Bangalore 86

Related articles 
How to Waterproof your Terrace/Roof

How to Waterproof your Terrace using Waterproof Coatings

Waterproofing an existing terrace/roof slab 


Materials required

1. Latex polymer which can be used both as a primer for the top coat and also for preparing a polymer modified repair mortar. 
2. Ordinary Portland Cement (OPC).
3. Acrylic Top Coat  (Waterproof Coating)- Acrylic polymer modified coatings have extremely good UV resistance and crack bridging abilities. Some acrylic top coats also have additional benefits such as heat reflection.

Surface Preparation

. The cement surfaces must be cleaned free of loose materials, oils and other contaminants.
. Check the screed for hollow spots using the wooden handle of a hammer. 
. Any sections found to be hollow (screed de-bonded from the mother slab) must be repaired using a polymer modified mortar.
. All surface cracks must be checked for integrity. Any loose cracks must be chipped and repaired using a polymer modified mortar. Cracks that are not loose and not greater than 2mm can be filled using a crack filler. 
. Rinse the surface with clean water to remove any dirt. 
. Saturate the cement surface with water. Saturation prevents the coatings from curing prematurely due to absorption of water.  

Application 

. Apply a coat of primer which penetrates the porous surface and seals the pores and allows for good bonding of the protective top coat to the cement substrate. Priming can be achieved using specialized primers or using latex polymers diluted to the specified consistency. 
. In the case of latex primers, while the primer is still tacky (after approximately 30-45 mins, depending on the surface temperature) apply the 1st coat of an acrylic top coat. For other primers follow the manufacturer's instructions.
. After the 1st coat has cured for about 3-4 hours, apply the 2nd coat in a direction perpendicular to the direction of application of the first coat. In case of large roof spans, a glass fiber mesh can be embedded between the 1st and 2nd coats by loosely laying the fiber mesh on the cured 1st coat and then applying the 2nd coat on top of it.
. A 3rd and final coat can be applied after about 6-8 hours.

The above system can be left exposed and no screeding is required for low - medium foot traffic. The above system has a life expectancy of about 5-10 years depending on the foot traffic.